3.8 KiB
Ingenic Cloner Utility
The ingenic cloner application is a PC side utility that interfaces with the "USB-Boot" mode built into Ingenic SOCs. By placing the SOC into "USB-Boot" mode, you are able to use the ingenic clonger application to directly flash the firmware chip without physically removing, or interfacing to the flash chip.
This guide is a work in progress.
Shorting pins on flash chip
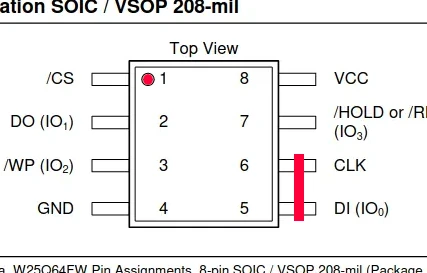
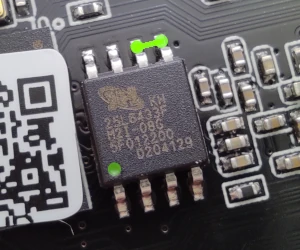
The first thing to do is locate the flash memory chip on the camera circuit board. Typically this is a square chip with 8 pins labeled 25Q64 or 25Q128, rarely 25L64 or 25L128. If you have trouble locating the chip, try taking some pictures of your board from both sides. Then ask for help in our Telegram channel. Do not try to short-circuit any random chip! It will most likely burn your camera circuit.
Short-circuit pins 5 and 6 of the flash chip with a small metal object, a screwdriver or tweezers, right after the bootloader starts but before it calls up the Linux kernel.
Pins 5 and 6 of the SOIC8 chip are on the opposite corner of pin 1, indicated by the embossed or drawn dot next to it.
Download Cloner: OpenIPC Utilities
OpenIPC Cloner Application Guide
-
Accessing Cloner:
- Navigate to the "cloner-2.5.xx-ubuntu_alpha" directory, with "xx" indicating your downloaded version of Cloner.
-
Preparing for Firmware:
- Create a new folder named
0_OpenIPC_Firmwarein this directory.
- Create a new folder named
-
Launching Cloner:
- Open the
clonerapplication. Ensure you are using version 2.5.43 or later for compatibility.
- Open the
-
Initial Setup:
- Click "Load Image" and select the "openipc_cloner_bundle_xxx.zip" file.
- If the lock level is "2", change it to "0". Enter '!@#' (exclamation, at symbol, number sign, without any quotation marks) as the password. The 'Config' button should reappear.
-
Configuration Settings:
- Click the 'Config' button in the top-right corner.
-
Navigating Configuration:
- In the Config window, under the "Info" tab, access various configuration menus.
-
Device Specific Settings:
- Select 'Platform T'.
- Choose the appropriate SOC version for your device next to Platform 'T'.
- Under 'Board', select the relevant operation:
txxx_sfc_nor_reader_8MB.cfgfor 8MB flash chip devices.txxx_sfc_nor_reader_16MB.cfgfor 16MB flash chip devices.txxx_sfc_nor_writer.cfgfor writing individual partitions.txxx_sfc_nor_writer_full.cfgto flash the entire chip.
- Click "Save" to return to the main screen.
-
Starting the Program:
- With your desired profile loaded, click "Start" on the main screen.
-
Device Recognition Procedure:
- Plug the USB cable into the device, leaving the other end unplugged.
- Short pins 5-6 ON THE FLASH CHIP, not SoC or any other chip, use the photos as a reference, as described earlier in this document.
- While maintaining the short, connect the USB cable to the computer. Wait 2 seconds, then release the short.
- It may take up to 30 seconds for Cloner to recognize the device. Progress bars on the main screen will indicate ongoing operations.
-
Completion:
- Once all progress bars turn green, the operations are complete.
Carefully follow these steps to ensure the Cloner application is set up correctly and operates as expected.